Cara update Sony Xperia Jelly Bean 4 3 Xperia M

| 0 comments |
 Sony PC Companion adalah sebuah software yang disediakan secara gratis oleh pihak Sony Mobile untuk mempermudah para pengguna smartphone sony untuk melakukan transfer data dari pc ke ponsel atau sebaliknya, instal aplikasi dan termasuk untuk memperbarui system ponsel / upgrade firmware.
Untuk upgrade firmware Sony Xperia via Sony PC Companion yang perlu anda persiapkan sbb :
1. Download Sony PC Companion disini
2. Install Sony PC Companion di PC atau Laptop Anda.
    
      Persyaratan sistem yg dinjurkan :

  • Koneksi internet broadband
  • Intel® Pentium® 4, 3,6 GHz atau prosesor AMD yang setara
  • 500 MB ruang diska bebas
  • 2 GB RAM
  • Tersedia 1 porta USB 2.0 dan kabel USB
  • Microsoft® Windows XP™ SP3 (32 bit), Vista (32/64 bit) atau Windows 7 (32/64 bit) atau Windows 8 (32/64 bit)*
3. Backup data ponsel Anda jika diperlukan.

4. Buka Sony PC Companion (Koneksi internet tersambung)
 
 5. Sambungkan ponsel Anda ke PC melalui kabel data USB, tunggu sampai ponsel Anda terdeteksi.
Jika tersedia pembaruan firmware maka akan muncul pesan seperti gambar berikut.
Kemudian klik "A phone / tablet software update is available"
 
Klik "Update"

 Download Support Zone (2Mb)
 
Klik "Accept"  
 

Proses update / upgrade dimulai secara otomatis 

  *Disarankan untuk tidak mengotak-atik ponsel saat proses upgrade untuk mencegah koneksi kabel USB terputus.


Tunggu sampai proses finish, lama proses tergantung kecepatan internet Anda. Dan jika nanti muncul pilihan instalasi klik "Install", dan nanti ponsel akan melakukan reboot secara otomatis.
Proses booting pertama kali memakan waktu beberapa menit (Itu wajar jangan panik :D).
6. Selesai, Cabut kabel data USB.

 === > DOWLOAD Sony PC Companion_shintacell < ===


Read More..

download net framework 3 5 windows8 offline instal direct link

| 0 comments |
Download .net framework 3.5 windows8
.net framework


Selamat Malam Teman2 semuanya , pada kesempatan ini ane mau bagi-bagi software yang sangat bermanfaat bagi semua orang,, pasti semuanya bertanya, bagaimana cara instal .net framework 3.5 di windows 8 atau windows 8.1 ? kenapa windows 8 tidak bisa menginstal dot net framework versi 3.5 ?
nah, dari pokok permasalahan tersebut, kalian jangan kawatir, karena saya sudah punya solusi buat teman-teman sekalian.
betapa pentingnya .net framework versi 3.5 bagi pengguna windows, padahal .net framework sudah memiliki versi terbaru yaitu versi 4.5, kenapa versi 3.5 masih saja diperlukan ? itu yang membuat saya bingung, hehe.
mau tidak mau kita wajib menginstal .net framework versi 3.5 untuk menunjang berbagai kegiatan di PC kita yang membutuhkan .net framework.

langsung saja ya..
ini dia software .net framework 3.5 yang berhasil saya instal tanpa konek internet.

Silahkan download disini bagi pengguna windows 8 64bit
.Net Framework 3.5 windows 8 64bit

SIlahkan download disini bagi pengguna windows 8 32bit
.Net Framework 3.5 windows 8 32bit


sekian dari ane,, semoga software ini bermanfaat bagi kalian semua yee.. jika ada pertanyaan silahkan bertanya di bawah !,


Read More..

What is bad apples effect

| 0 comments |
136.   When one or more individuals in the group withhold effort, express negative feelings and attitudes, and violate important team norms and behaviors, the effect is called the:
a.
bad apples effect
b.
sucker effect
c.
slowdown effect
d.
free rider effect


ANS:  A                  

137.   When team members hesitate to help or provide constructive feedback, what team dysfunction might be occurring?
a.
avoidance of accountability for results
b.
free riding
c.
absence of trust
d.
bad apples


ANS:  C                   

138.   When team members do not commit to a clear set of goals and plan of action, what team dysfunction might be occurring?
a.
bad apples
b.
absence of trust
c.
free riding
d.
avoidance of accountability for results


ANS:    D
Read More..

Angry Tarzan Android Mobile Game Free Download

| 0 comments |
Angry Tarzan game made at Jungle in which a jungle boy is placed. When you played this game in which you are a jungle boy and you eat and collect many fruits, health. You can control it by four keys in which you walk left then you touch Left side, if you walk right then touch on right side of screen. So that if you want jumped and release Boom rang then touch on jungle boy. So, from these you easily escape from enemies. You download by Home page of internet and enjoyed it. Different and graceful graphics support this jungle game. You watch jungle map from the help of this game information options. This game speed is improves from others games. This game is not update so, one time download and then enjoyed it always. 


QR Code For Angry Tarzan Android Mobile Game

 Click the image Below to Download Angry Tarzan Android Mobile Game Free.


Read More..

Light Flow – LED Notifications v3 15 109 Apk

| 0 comments |
Light Flow allows you to take control of your notification LED colors and makes them successively flash one color after another.
It also allows you to set repeating sounds on vibration patterns for you notifications. You can also set a “sleep” mode or “on charge” where the lights and/or sounds and vibrations will not be heard or seen. If you’ve come from a Blackberry device and miss the features of BeBuzz / BerryBuzz then give LightFlow a try!
This program will allow you to control the notification color for the over 600 applications and system events such as:
* Missed calls
* Voice mail
* Calendar reminders
* gmail
* email
* SMS messages
* MMS messages
* Low battery
* No signal
* Google talk
* Facebook
* Twitter
…and many many more
What’s New
3.15.109 (in staged rollout 50%)
Fix for hanging on some sony phones
Changed default settings for Xperia illumination bar phones
Reworked switch screen on option to prevent delay
Better text to dashclock, pebble, smartwatch on android 4.3
Vibrate while in call working on more phones
Option for simpler text in lightflow persistent notification just listing the number of notification types on
Bug fixes
Many more changes


 light flow apk

Read More..

FASTBOOT METHOD OF RECOVERY TO FIX ALL ISSUES IN YOUR PHONE AND RESTORE IT TO FACTORY STATE

| 0 comments |
Hola Friends,

First things first. If you are not a Xiaomi Redmi 1s user, this post is not for you. I couldnt include that part to the title due to obvious reasons.

When will you need this?

  1. If you found some issue in one rom that keeps occurring in future ROMs as well, look no further, this is for you.
  2. If your phone is on a custom ROM and it has so many issues that need fixing
  3. If you want to get the phone back to factory state in all aspects

 Note that using this method will re install all the basic stuff such as audio drivers etc

Stuff you will need


  1. A PC - we are gonna be doing the flashing via pc
  2. Fastboot rom - note that the fastboot rom is not the same as the other normal ROM zip file that you use to flash via custom recovery. Fastboot ROMs are larger in size and can be found here
  3. Minimal adb fastboot set up  from here
  4. A .tar file extractor like Peazip from here to initially extract the fastboot rom and another one like 7-zip here to extract the initially extracted file.
Obviously you will need to have a Redmi 1s  that can boot to fastboot mode which we will talk about later and a usb cable and the phone should be charged to atleast 60%.

PROCEDURE

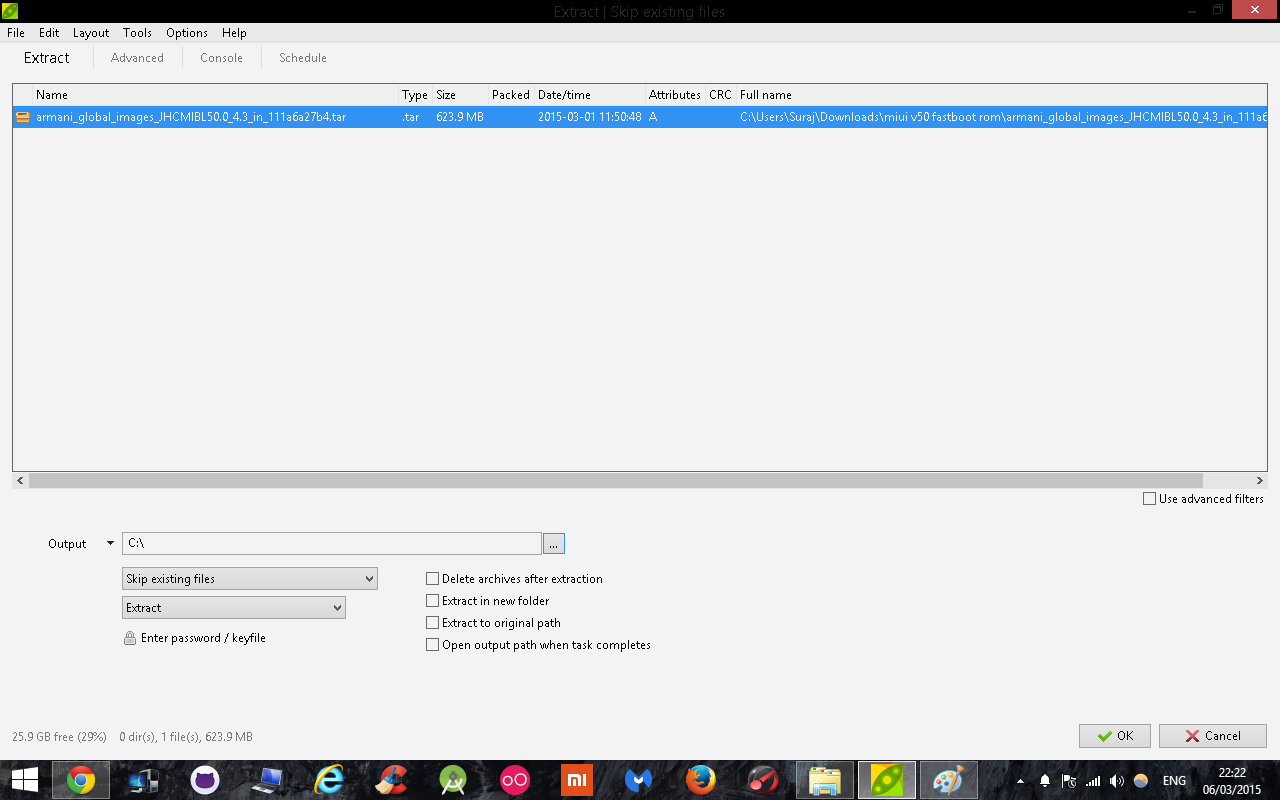
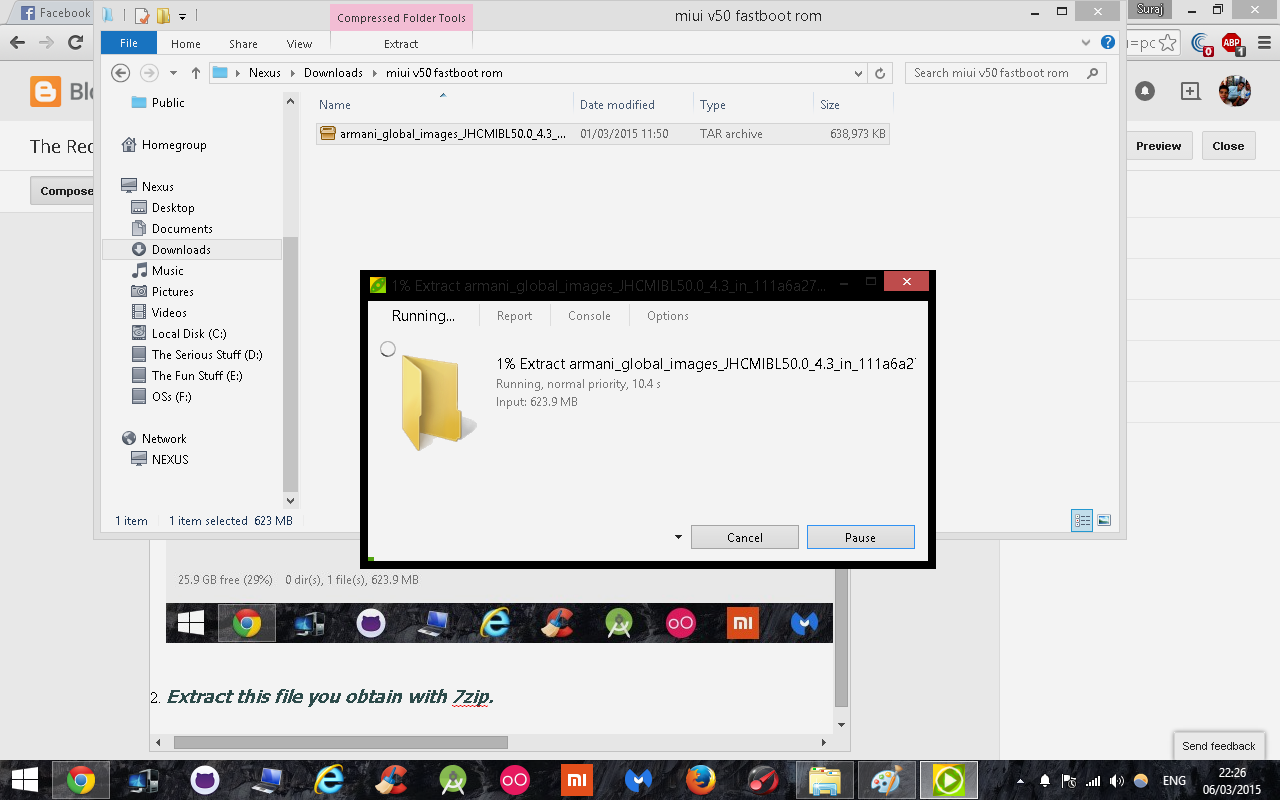
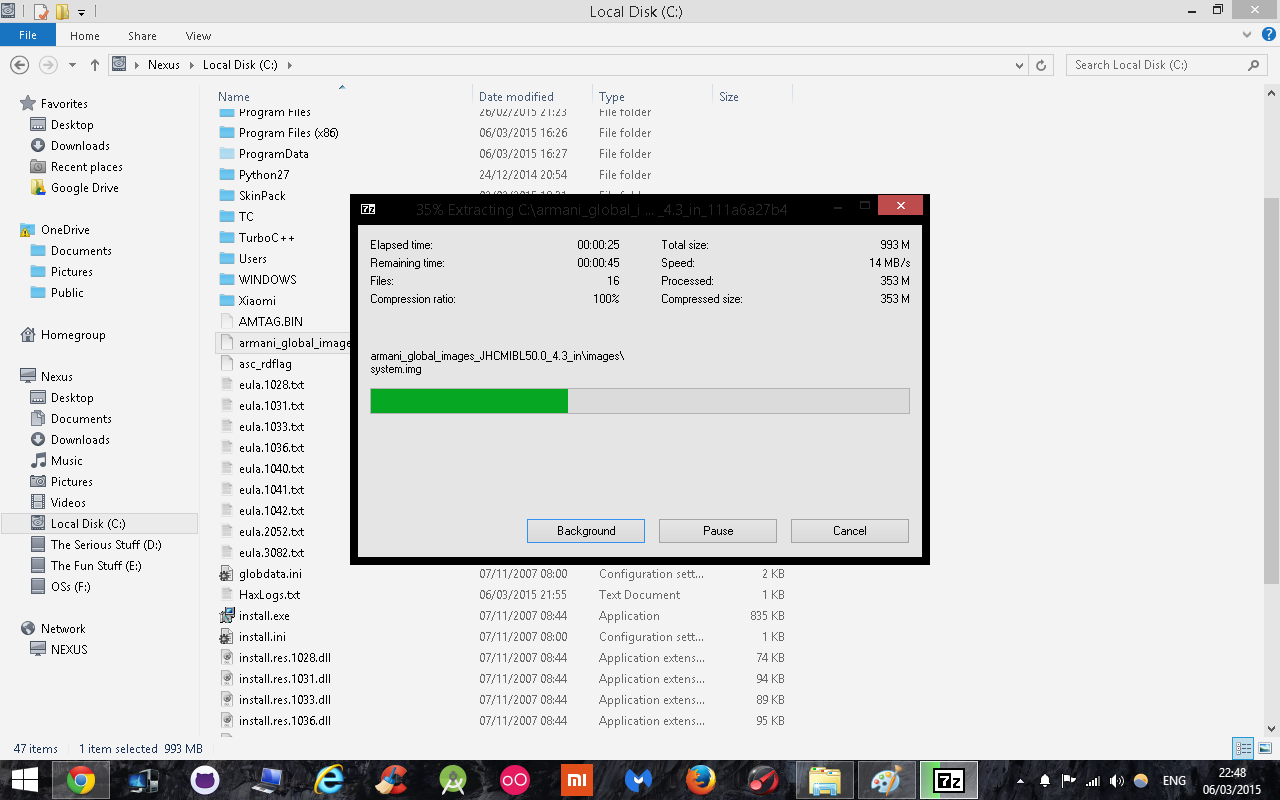
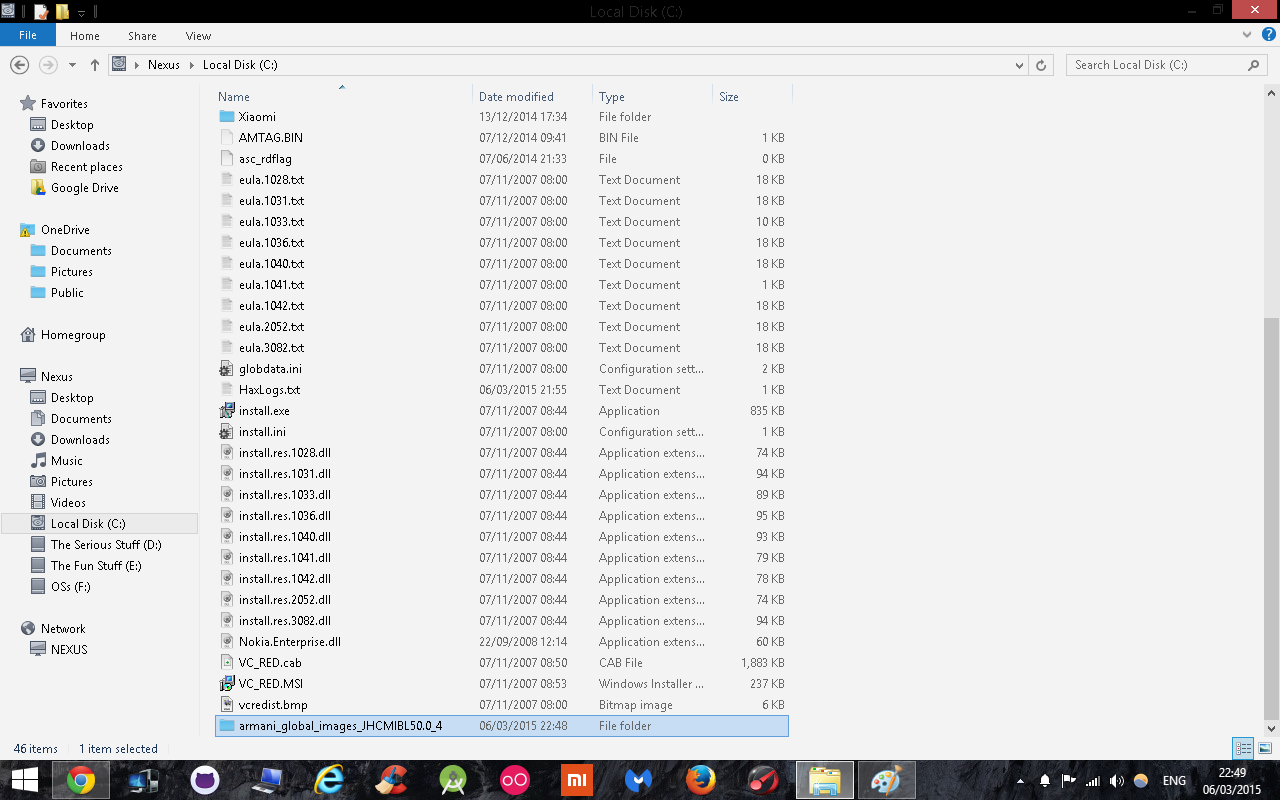
  1. Extract FASTBOOT ROM in "Drive C:" using Peazip


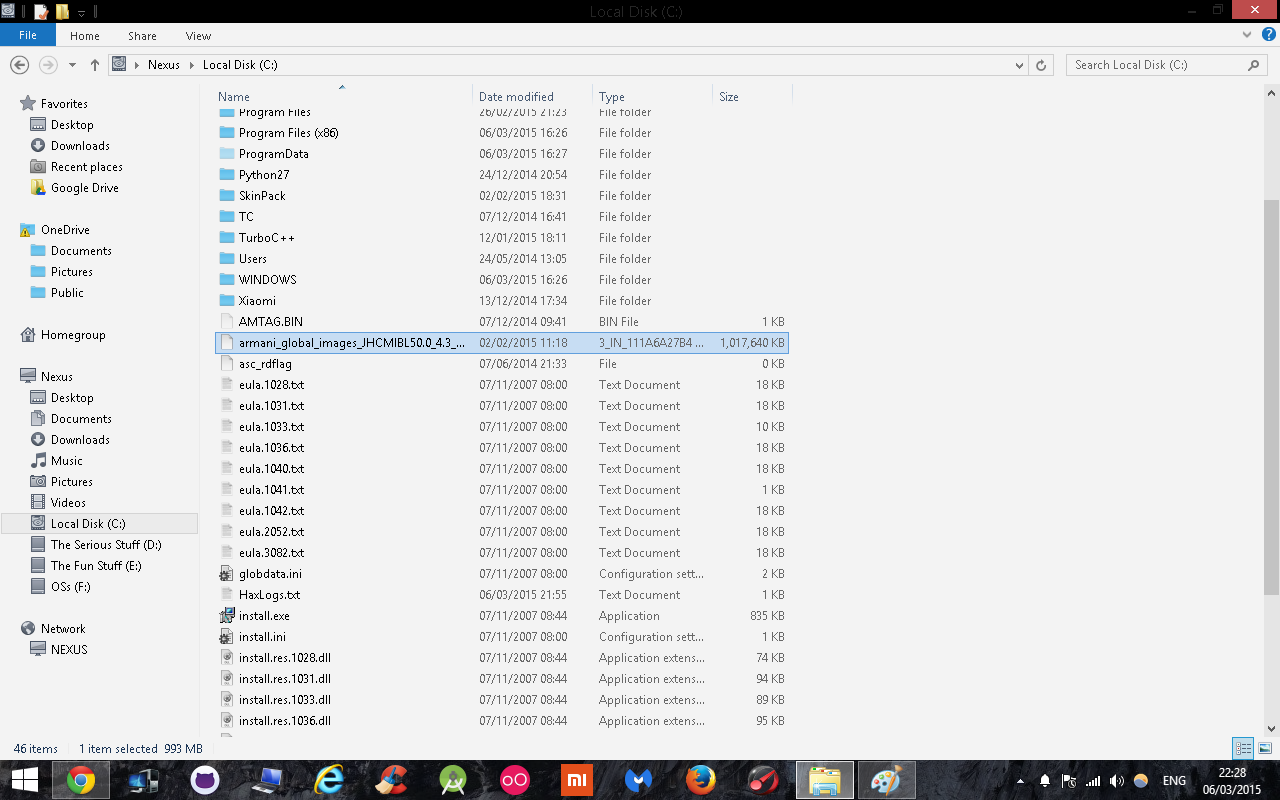
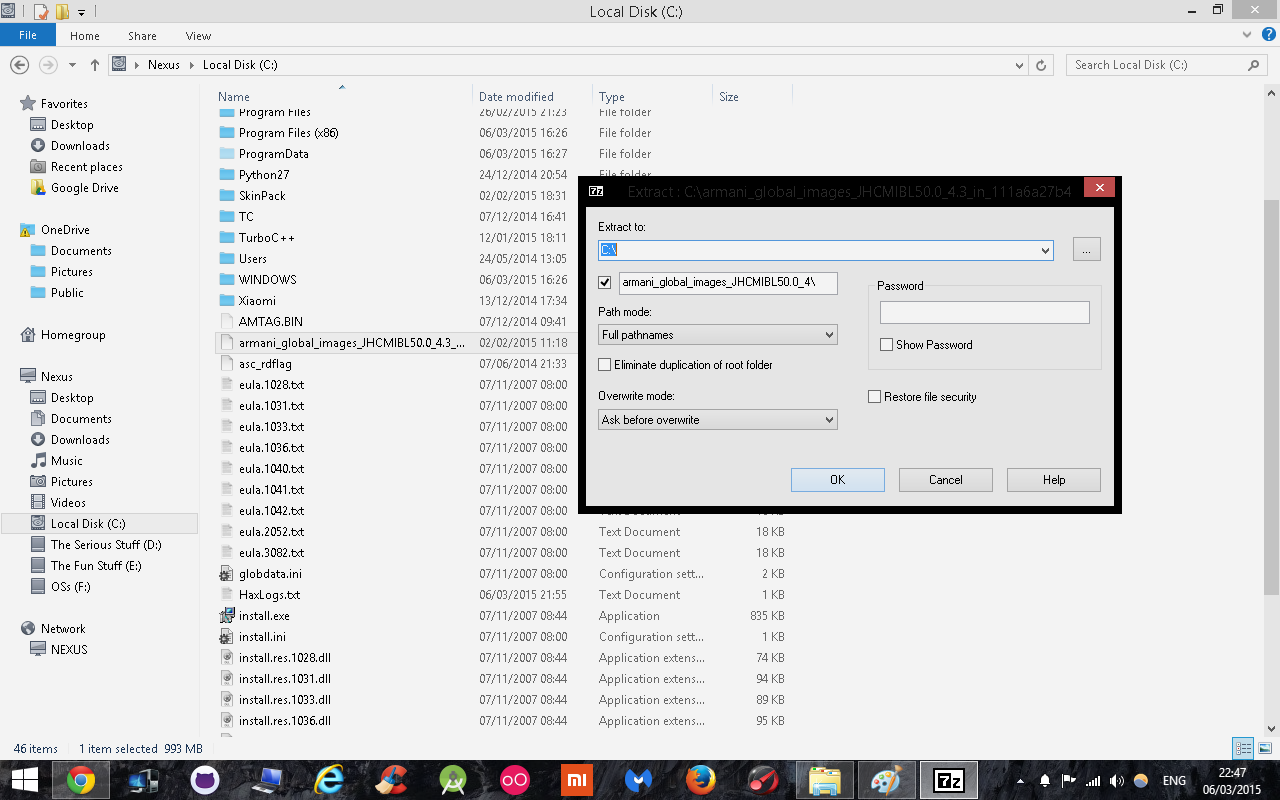
2. Extract this file you obtain with 7zip.


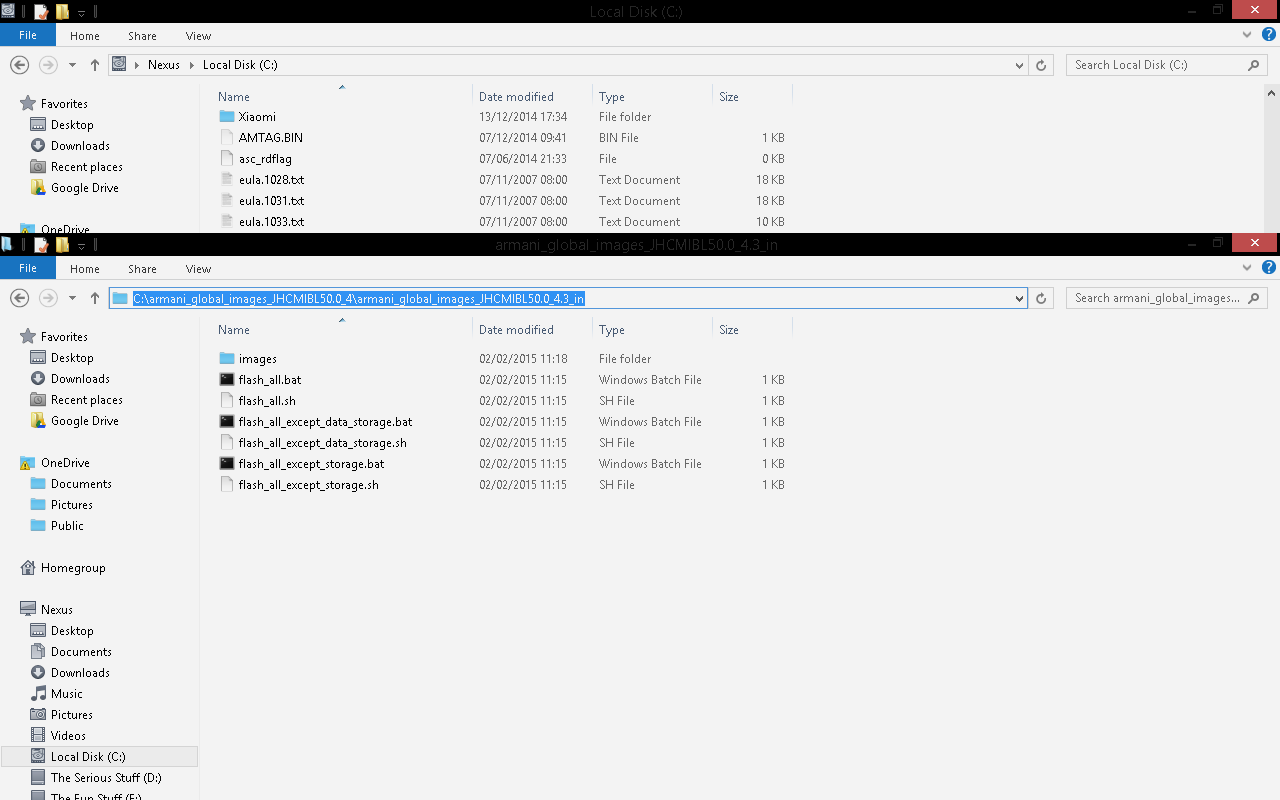
3. Open this folder and the folder inside it and copy this address(ctrl+c)


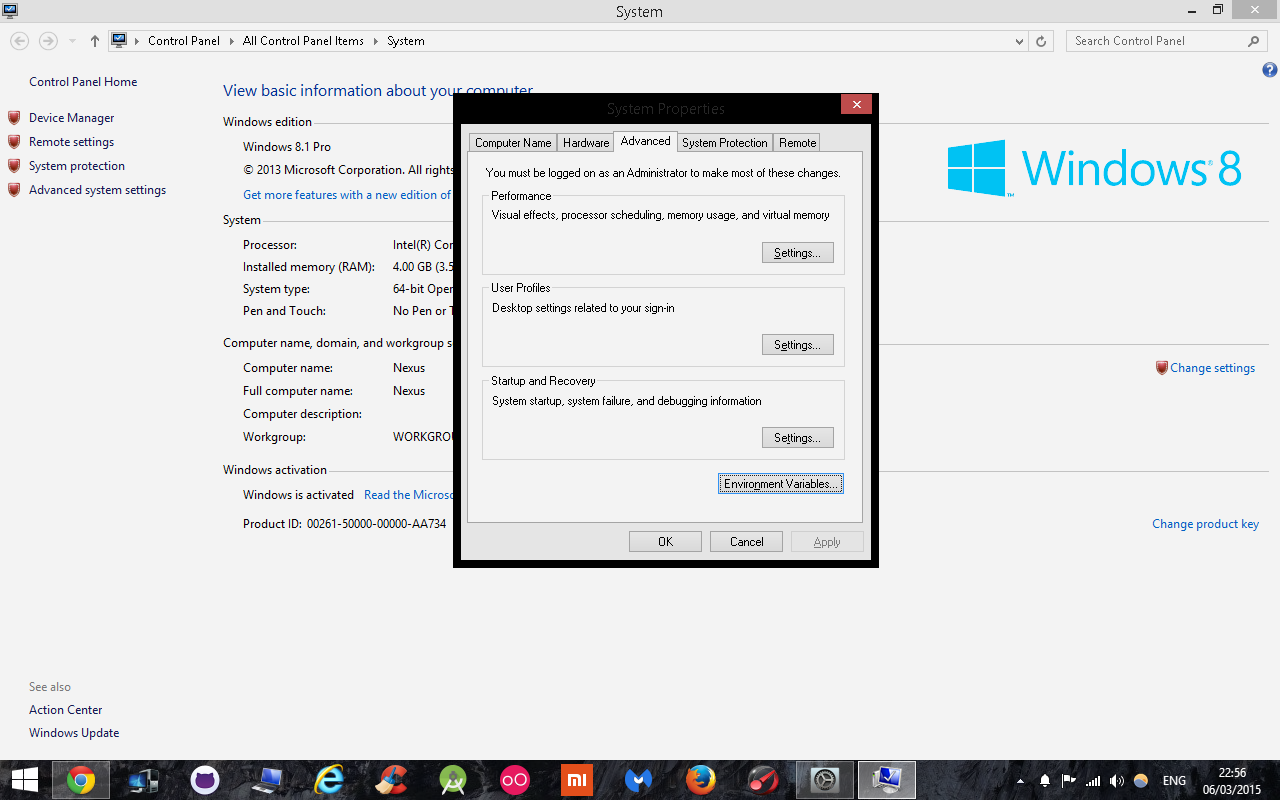
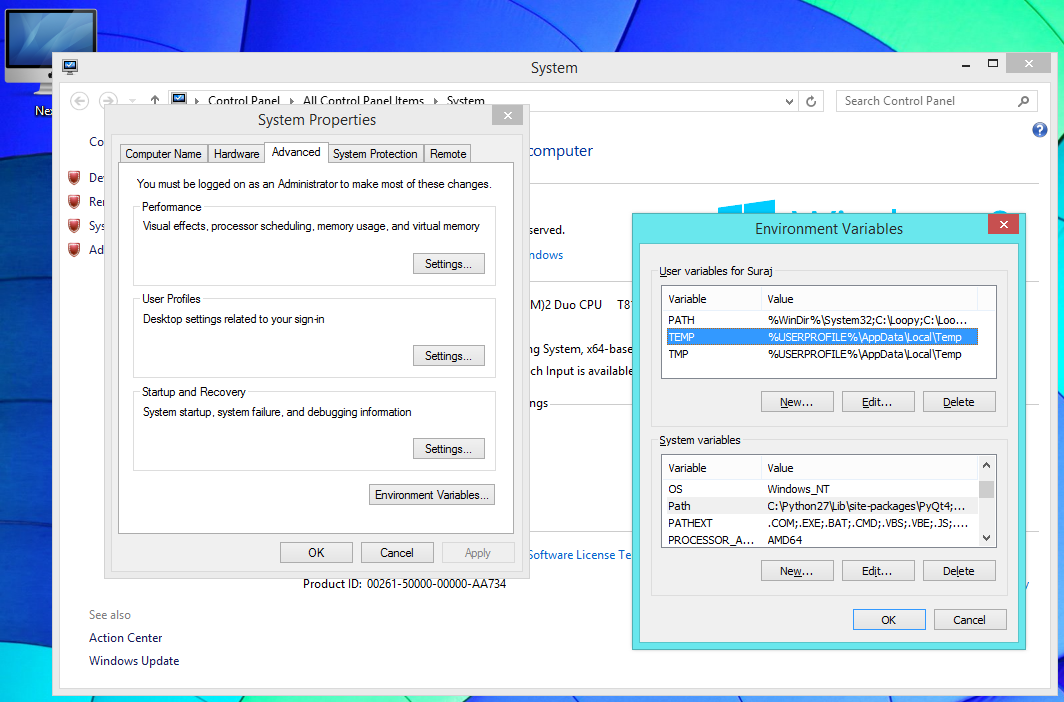
3. Right Click on "Computer" -> Go To Properties -> Then Advanced System Settings


Click on environment variables


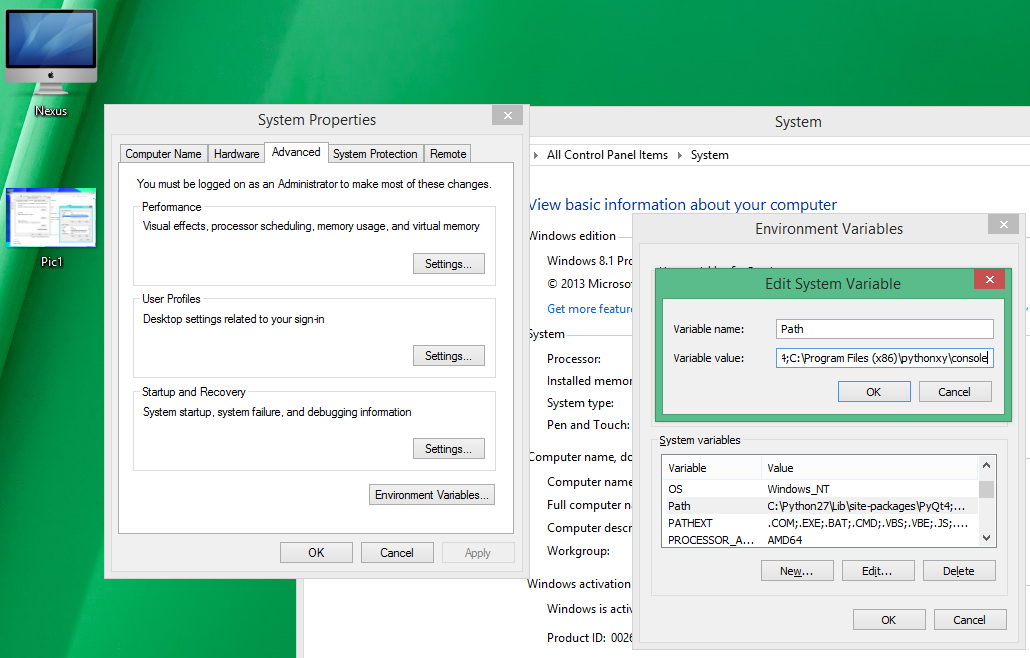
click on temp in the user variables section and path in the System variable section and then click on edit

click in the variable value box and to the end of the text , add a ; and then paste the text copied in step 3 here. Click on OK.

4. Close everything and open My Computer > C and navigate to the place where we extracted the fastboot rom. The address will be something like C:armani_global_images_JHCMIBL50.0_4armani_global_images_JHCMIBL50.0_4.3_in
Here there will be 3 .bat files namely 
1. Flash_All 
2.Flash_all_except_data_stroage 
3.Flash_all_except_storage

Boot your phone in fastboot mode by pressing and holding Power button+Volume down button after switching off the phone.

Next double click on one of the three options you saw above
I would recommend you to go with the first option(flash_all.bat)
Wait until the the process completes and the phone will automatically boot after the procedure is complete.

ENJOY YOUR REDMI 1S IN ITS BRAND NEW STATE!!! :D

In case you have any queries or clarifications, feel free to leave comments below. I shall answer them ASAP!!! 

Read More..

Cara Instal CWM Recovery Mito t300 Tanpa PC

| 0 comments |
Nah ini dia Tutorial yang belum saya sampaikan :3 . Padahal udah di sharing Custom ROM nya tapi belum Dishare cara Instal CWM nya hehe gimana mau instal Custom ROM kalau gak ada CWM nya ? haha langsung aja

SYARAT & BAHAN:
======
Harus sudah Root

1. Mobileuncle Tools - Download Disini 
2. CWM v6 - Download Disini
======
TUTORIAL :
======
1.Download Mobileuncle Toolsnya- Download CWM v6 nya
2.Setelah Di Download , Install apk nya - Taruh Final Recovery t300.img nya di SDCard
3.Rename CWM v6 nya jadi recovery.img
4.Buka Mobileuncle Tools muncul Super user , klik Allow
5.Setelah dibuka , Klik "recovery update" ada notifikasi klik aja OK pilih "recovery.img" di SDcard
6.Nanti akan Ter Reboot Sendiri :D

======
KETERANGAN :
======
Untuk Masuk ke Recovery
-matikan hp
- Tekan Tombol Power Button + Vol.Up
maka akan keluar pilihan seperti

[recovery    mode]   - Masuk Menu Recovery CWM
[fast           mode]
[normal        boot]

Nah dalam Mode ini Klik "Volume Up" untuk Memilih dan "Volume Down" untuk Ok/Yes
Jika Masuk CWM klik tombol seperti biasa , "Volume Up" ketas "Vol.Down" kebawah "Power" Ok/Yes
======
Kurang Jelas ? Koment aja
Semoga Bermanfaat , Terimakasih
Read More..